In this post I am going to explain process of mounting an EFS disk in fargate service in AWS.
First step is to define volumes in task definitions. I am going to use an file browser container in this exercise which allow you to browse root file system of container. This container should be used only for experimentation and should be terminated as soon as you are done with your experiment.
I am creating a task definition fargate-filebrowser1 of fargate type.

Click on "Add Volume" link at the bottom of task definition page and fill in details of EFS volume.

After adding EFS volume to task definitions add container to task definition. You can add multiple containers to one task definitions but we will add only one. After clicking "Add Container" button provide container name and image name:

The Image name is jasvantsingh/myfilebrowser:latest it is based on filebrowser/filebrowser with just one change that it exposes root file system rather than one directory.
Scroll down to bottom of container options and provide mount point for EFS volume inside the container.

The EFS volume will be mounted at /vol2 as per this configuration. Any file created inside /vol2 directory will be persisted across task restart or deletion of service and recreation of service. EFS is a kind of NFS mount which reside on some other persistent storage outside the container.

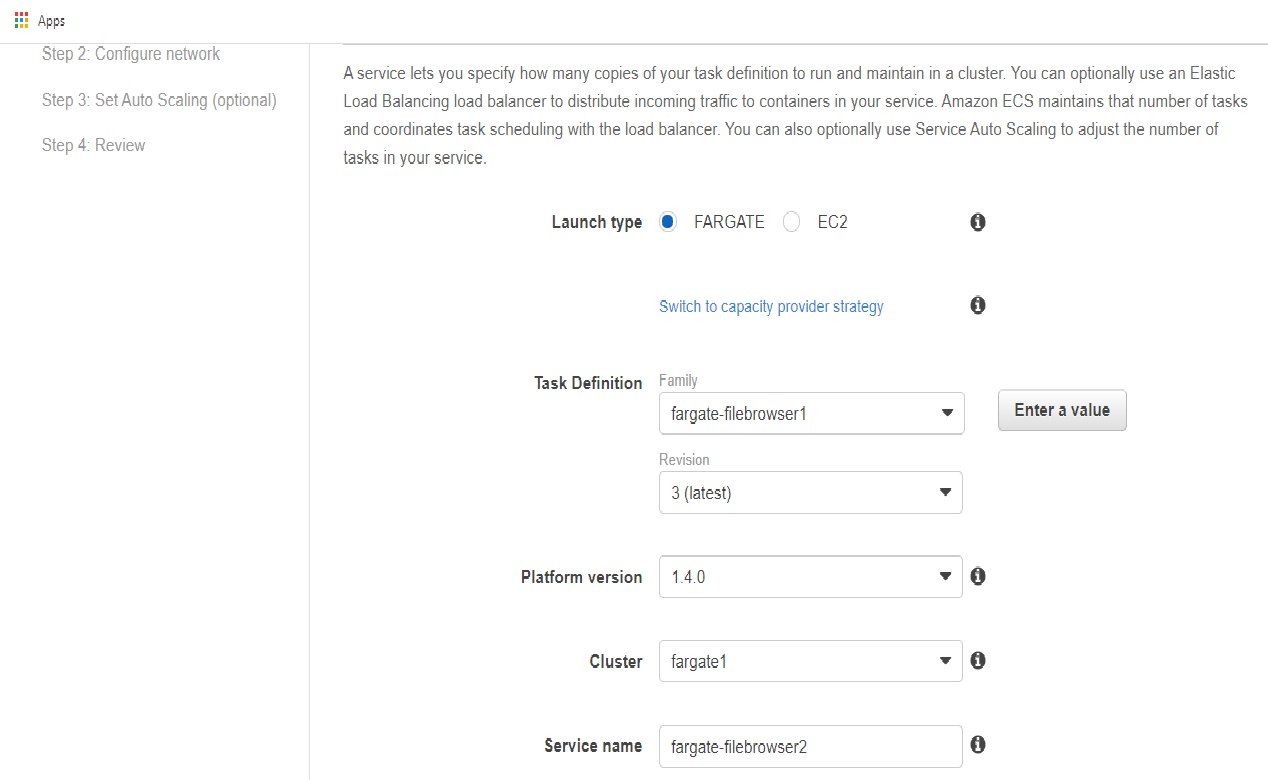
Click on "Create" button under service tab of your cluster.

Provide service details. Please note that you need to select PLATFORM version 1.4.0 and not LATEST. LATEST version does not work maybe it is not mapping to 1.4.0

On the next screen provide networking details. Please make sure that "Auto-assign Public IP" is ENABLED. I will not be using any load balancer so the task need to have a public IP address to be accessed from outside.

On Auto-scaling screen keep auto scaling as disabled.

On review screen click create service button. The service will be created. Click on "View Service" button. It will take you to service details page. Wait for some for task to be started and listed in Task tab.

Click on the task ID. It will take you to task details page. Please note the public IP address of the task.

Paste the public IP Address in browser and access the file browser. User username as admin and password as admin for login in the file browser. You can see "vol2" directory there. This is persistent directory. You can place any file inside this directory and it will be persisted.

Please make sure to terminate the service and task because anybody can hack into this file browser and put malicious content there without your knowledge. This file browser is only for experimentation.
Please comment if something is not working. I will reply to your comment.
First step is to define volumes in task definitions. I am going to use an file browser container in this exercise which allow you to browse root file system of container. This container should be used only for experimentation and should be terminated as soon as you are done with your experiment.
I am creating a task definition fargate-filebrowser1 of fargate type.

Click on "Add Volume" link at the bottom of task definition page and fill in details of EFS volume.

After adding EFS volume to task definitions add container to task definition. You can add multiple containers to one task definitions but we will add only one. After clicking "Add Container" button provide container name and image name:

The Image name is jasvantsingh/myfilebrowser:latest it is based on filebrowser/filebrowser with just one change that it exposes root file system rather than one directory.
Scroll down to bottom of container options and provide mount point for EFS volume inside the container.

The EFS volume will be mounted at /vol2 as per this configuration. Any file created inside /vol2 directory will be persisted across task restart or deletion of service and recreation of service. EFS is a kind of NFS mount which reside on some other persistent storage outside the container.

Click on "Create" button under service tab of your cluster.

Provide service details. Please note that you need to select PLATFORM version 1.4.0 and not LATEST. LATEST version does not work maybe it is not mapping to 1.4.0
On the next screen provide networking details. Please make sure that "Auto-assign Public IP" is ENABLED. I will not be using any load balancer so the task need to have a public IP address to be accessed from outside.

On Auto-scaling screen keep auto scaling as disabled.

On review screen click create service button. The service will be created. Click on "View Service" button. It will take you to service details page. Wait for some for task to be started and listed in Task tab.

Click on the task ID. It will take you to task details page. Please note the public IP address of the task.

Paste the public IP Address in browser and access the file browser. User username as admin and password as admin for login in the file browser. You can see "vol2" directory there. This is persistent directory. You can place any file inside this directory and it will be persisted.

Please make sure to terminate the service and task because anybody can hack into this file browser and put malicious content there without your knowledge. This file browser is only for experimentation.
Please comment if something is not working. I will reply to your comment.