I this post I will be explaining steps to configure AWS CLI in a CentOS virtual machine configured in AWS. I have chosen CentOS instead of Amazon Linux because it is free and it is also available for your local PC and other cloud providers like Google Cloud.
First you need to create a AWS Instance by clicking Launch Instance button in AWS EC2 dashboard.
Choose AWS marketplace in Choose AMI screen.
Search for CentOS in the marketplace and select CentOS 7 AMI.
Select t2.micro as instance type. This instance type is free tire eligible. It mean that use of this instance is free for first year after registration.
Next you need to select subnet for the instance. I already have an subnet created so I am using that. Please make sure that you have
Auto assign Public IP setting enabled. If you don't enable it then your instance will not get a public IP address attached to it and due to that you will not be able to connect to it.
Next you need to add storage to the instance. Upto 30GB General purpose storage is free for first year after registration. So I am using 30GB storage space.
Now add
Name tag to the instance so that you can identify it.
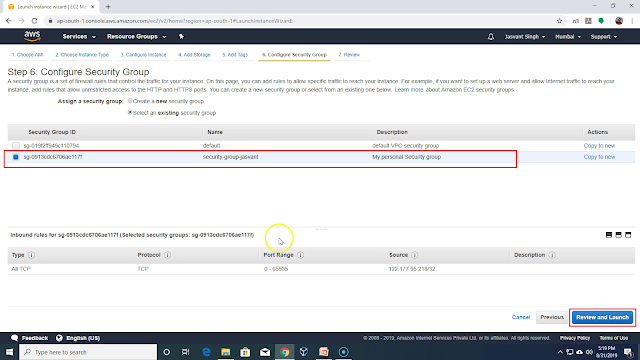
Next you need to attach a security group to the instance. I am using an existing security group. The security group is used to configure incoming and outgoing network connection permissions. I am using it to allow incoming connection to AWS instance only from my PC so that no one can hack my AWS instance. If you allow incoming connections from whole world then there are attacks from China and Russia which consumes a lot of bandwidth and you get charged for it. So make sure that you allow incoming connections from your PC only.
Next you need to create a public-private key pair. Public key will be installed into the machine and private key will be downloaded to your PC. Using private key you will be able to login to the AWS instance without password. Authentication will be based on the private key present in the your PC. You need to keep copy of private key at multiple location to recover in case of disk failure or any other problem in your PC. Without private key you can't login to your AWS instance. Download the key to your local PC and launch the instance.
Once instance is started. Click on the security group to configure incoming connection permission on the AWS instance. Security group permissions apply to all instances in the security group. Currently we are having only one instance instance in the security group.
Click on
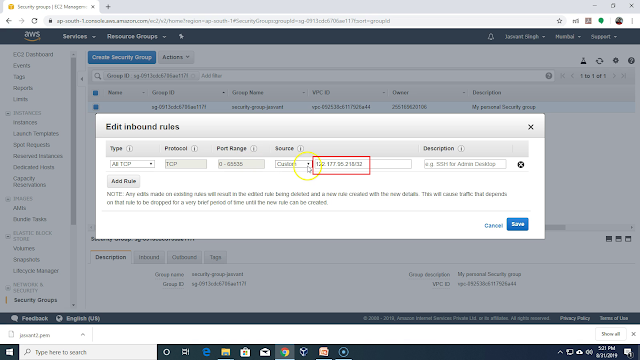
Edit Inbound rules.
In the Inbound rules remove all rules and add only one rule which allows incoming connection on all ports from your PC. You can click on combo box in source column and select "My IP" to select your public IP. Once rule is set it will allow incoming connection only from your IP address. For some ISP the public IP address keep changing. So connection attempt to instance using putty will fail if public IP address was different while setting incoming rules and when you try to connect using putty. To fix this problem you need to add all IP addresses which your ISP can assign to you. IP addresses assigned you you are not random but has a common prefix. You can add that prefix to incoming rules to allow all IP addresses with that prefix. If you add 122.177.95.0/24 as source then it will allow all IP addresses in range 122.177.95.[1-255]
Now you need to convert private key for the instance downloaded earlier to format recognized by putty. Putty can't use the private key downloaded directly. You need to run PUTYGEN.EXE and click on load button.
Select the private key file downloaded earlier. In my case the private key file is named
jasvant2.pem
Once key file is imported successfully you need to save it in putty's format. You need to click on
Save private key button.
When you click Save private key button, it shows a warning message that private key not encrypted with a parse phase. If parse phase is not provide anybody can use the private key file to connect to the AWS instance. If parse phase is provided then every time you use key file for connecting to server you will be prompted for parse phase. I choose not to provide a parse phase. Click on OK button to remove the warning message.
Provide the private key file name in Putty's private key format and click on
Save button.
Now click on PUTTY.EXE to run putty and use public IP address of the running AWS instance.
Now click on Auth and select the private key file in Putty's private key format.
Select the private key.
Once private key is selected and connect button is pressed. It will show a warning with public key of the server and ask you for confirmation from you if you accept the public key. Click on
Yes button.
Provide centos as username to connect to AWS instance.
Now follow instruction provided in web page
https://docs.aws.amazon.com/cli/latest/userguide/install-linux.html
Run
python --version command to check python version installed on AWS instance.
Run
curl -O https://bootstrap.pypa.io/get-pip.py command to download PIP installer which is required for installing AWS CLI.
Run
python get-pip.py --user command to install PIP which is required by AWS CLI.
Add an export command at the end of your
~/.bash_profile file.
export PATH=~/.local/bin:$PATH
Reload the profile into your current session to put those changes into effect.
source ~/.bash_profile
Use pip to install the AWS CLI.
pip install awscli --upgrade --user
Now open AWS console and click on IAM.
Click on Add user button.
Provide user name and select programmatic access.
Add permission boundary. I am setting it to custom policy which allow access to all S3 operations.
AWS is giving warning that user has no permissions attached to it. It is a mistake and I will correct it in my next post. I will add permissions to user before performing any S3 operations. Click on
Create user button.
Now download .csv file with details of credentials to be used for accessing the AWS APIs.
Note down region ID for region which you will be using with AWS CLI. For Mumbai it is ap-south-1
Now open credentials.csv file in notepad++ and copy Access Key ID and Secret Access Key. You will need it for configuring AWS CLI.
Now Run
aws configure command to configure credentials for accessing AWS APIs using
aws command.
In my next post I will be using aws cli for accessing s3 buckets and running a Map reduce program on EMR cluster.


