For installing Spark 2 in Cloudera VM we need to enable cloudera manager in your Cloudera VM. Since I am running Cloudera VM in a 4GB virtual machine configuration I need to --force option while setting up cloudera-manager because it exits without --force option because it require at least 8 GB RAM. The command for installing cloudera manager is:
sudo /home/cloudera/cloudera-manager --force --express
the above command installs cloudera manager on my VirtualBox VM the IP address for my virtual machine is 192.168.1.4
Now I open the cloudera manager user interface by typing 192.168.1.4:7180 in browser window. Username is cloudera and password is cloudera for login into cloudera manager.

Download latest JDK 8 from Oracle website https://www.oracle.com/technetwork/java/javase/downloads/jdk8-downloads-2133151.html Look for .tar.gz packaging for linux-x64.

Download it and put it in cloudera home directory on cloudera VM. I downloaded it on my windows machine and later on used Filezilla client for transferring it to cloudera VM. Filezilla is really useful in transferring files to and from cloudera VM. For connecting to cloudera you can use host local IP address of bridged IP address of cloudera machine. You can get ip address of VM by running "ip addr" command in Cloudera VM.
 You can download Filezilla client from https://filezilla-project.org/download.php?type=client
Open Filezilla site manager and add a site for Cloudera VM in it using IP address of cloudera VM shown in previous screenshot.

 Now transfer the downloaded JDK to cloudera VM using Filezilla client. Remember password for cloudera user is cloudera

Extract the jdk tar file in /usr/java directory from cloudera VM terminal.

Now open modify JAVA_HOME in /etc/profile to point to jdk 8 we just installed using "sudo vi /etc/profile" command.


sudo /home/cloudera/cloudera-manager --force --express
the above command installs cloudera manager on my VirtualBox VM the IP address for my virtual machine is 192.168.1.4
Now I open the cloudera manager user interface by typing 192.168.1.4:7180 in browser window. Username is cloudera and password is cloudera for login into cloudera manager.


Download it and put it in cloudera home directory on cloudera VM. I downloaded it on my windows machine and later on used Filezilla client for transferring it to cloudera VM. Filezilla is really useful in transferring files to and from cloudera VM. For connecting to cloudera you can use host local IP address of bridged IP address of cloudera machine. You can get ip address of VM by running "ip addr" command in Cloudera VM.

Open Filezilla site manager and add a site for Cloudera VM in it using IP address of cloudera VM shown in previous screenshot.


Extract the jdk tar file in /usr/java directory from cloudera VM terminal.


Now you need to modify /etc/default/cloudera-scm-server using sudo vi /etc/default/cloudera-scm-server command. add JAVA_HOME to this file.

Now you need to restart cloudera server using following commands:
sudo service cloudera-scm-agent stop
sudo service cloudera-scm-server stop
sudo service cloudera-scm-server start
sudo service cloudera-scm-agent start

Now confirm that new JDK 8 is picked by cloudera manager by logging into cloudera manager and looking at support about dialog box.


Now we can proceed to installing Spark 2 on Cloudera VM. We are going to follow https://www.cloudera.com/documentation/spark2/latest/topics/spark2_installing.html for installing Spark 2.
I downloaded Spark2 version 2.3.0 release 4 from https://www.cloudera.com/documentation/spark2/latest/topics/spark2_packaging.html#versions
after that I copied it into default CSD directory and changed ownership and permission as per the requiremnts by running the following commands:
sudo cp SPARK2_ON_YARN-2.3.0.cloudera4.jar /opt/cloudera/csd/
sudo chmod 644 /opt/cloudera/csd/SPARK2_ON_YARN-2.3.0.cloudera4.jar
sudo chown cloudera-scm:cloudera-scm /opt/cloudera/csd/SPARK2_ON_YARN-2.3.0.cloudera4.jar
Now change parcel configuration to disable parcel relation validation.


Now you need to restart cloudera manager services using following commands:
sudo service cloudera-scm-agent stop
sudo service cloudera-scm-server stop
sudo service cloudera-scm-server start
sudo service cloudera-scm-agent start
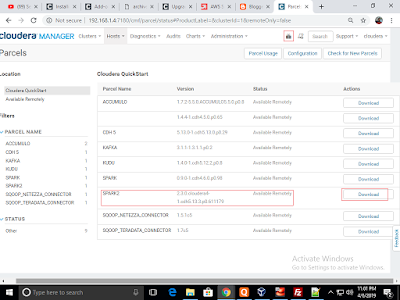
Once cloudera manager is restarted. Check for Spark 2 parcel. Now click on download button to download spark 2 to cloudera.

After download is complete click on Distribute button to distribute it to cluster.

Once distribution is done click on activate button to activate the parcel.

Once activation is done add spark 2 service to cluster.


After finishing adding the service my first run of spark2 failed. The error says that we need to install CDH parcel.

Now we need to install CDH 5 parcel in Cloudera manager. Click on download button. It is 1.7 GB in size so it will take some time for download.

After downloading CDH 5 click on distribute button.

Click on activate button once CDH parcel is distributed.

Restart the cluster after CDH 5 parcel gets activated.

Spark2 service failed to start with error saying Java 8 is required. So we need to set JAVA home directory for all hosts.


After setting Java home directory to Java 8 restart spark 2 service. I should start successfully.


